Preamble
Usually I'm pretty good about blogging about a trip during the journey or immediately after. Last year when I rode the Maah Daah Hey, the days were short and I was riding through every minute of daylight the first two days. And after I finished, I immediately headed off on another adventure, leaving me no time to do my usual post-trip recap.So here I am 15 months later, writing a single post about the amazing 3-day journey I had along the Maah Daah Hey Trail in late-September 2015. I figure that at least I'll remember more now than I will 10 years from now. I can keep these memories for the future and hopefully provide some guidance for others on similar journeys.
The Plan & The Trail
I first heard about the Maah Daah Hey probably in 2005 when a riding bud described it to me as a "one-hundred mile long ribbon of raw earth". I wasn't able to ride the Maah Daah Hey with him and some other friends the following year, but the idea stuck in my head.Fast forward to 2015: the same group of friends was planning a trip to Bend OR to do some riding. I decided that it would be most economical to drive there from WI, plus I can see some sights along the way. The plan was simple: drive all day to Medora, ND, ride the Maah Daah Hey the following three days, and then get back on the road, heading towards Montana, Oregon and further bike adventures.
The Maah Daah Hey was originally envisioned as a 100-mile long horseback or backpacking route in the badlands of North Dakota. Before I go any further I should say that though the trail was developed by the Forest Service, it is maintained by hard-working volunteers as part of the Maah Daah Hey Trail Association, and they could use your finance support if you're willing (they have a real fancy website, but on the ground they are as rag-tag, and in need of support as any trail care group).
Anyhow, the trail travels largely through the Little Missouri National Grassland connecting the northern and southern units of the Theodore Rosevelt National Park, with its southern terminus in Medora, ND. The trail has several camp sites you can stay at with restrooms and water every 15-25 miles. Since you can't ride a bike off-road in National Parks (generally speaking) the bike route starts at a campground called Bennett Camp, just south of the Northern Unit, and routes around the Southern Unit on the Buffalo Gap Trail. This creates a mountain bike route for the Maah Daah Hey trail that is about 96 miles long, but with a little exploring, wandering around and generally getting lost, you can expect you'll ride over 100 miles.
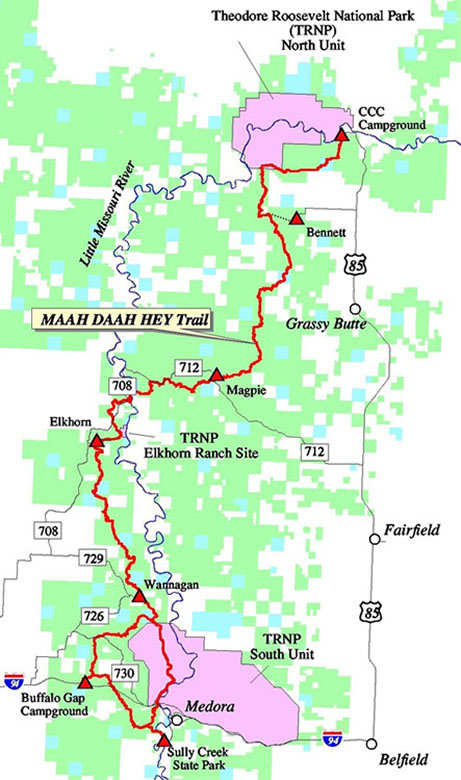 |
| From Bikepacking.net |
- Maah Daah Hey Trail Association's Trail Guide
- MTB Project's page on the trail
- Bikepacking.net's Route Guide
- New York Times story written by some greenhorns, but with good background info on the trail.
I had ridden over 100 miles in a day on a mountain bike on a couple occasions, and I briefly considered trying this. But I wasn't in great shape last year (and still am not now), and not only did this seem beyond my physical abilities at that time, logistically it would be difficult to get to the trailhead early enough in the morning to cover the distance in the 12 hours of daylight available at that time of year. If you want to try this, there is in fact the Maah Daah Hey 100 race in August, that seems like it'd be ungodly hot, but, whatever. I'd suggest trying it in early-June, when the day are long and before it gets too hot, and have some support so you can launch from the trailhead at dawn and have your gear waiting for you when you roll into town.
So it became a multi-day, bikepacking ride for me. And while I could probably cover 50 miles each day loaded with gear, why not enjoy the scenery a bit and stretch it out to three days? This ended up worked out very well. I'd suggest that anyone looking for a bit more of a challenge also tackle the newer, southern portion of the trail, often referred to as "The Duece" which adds 42 miles south of Medora.
I stuck to the original 100 miles. I made arrangements with Jenifer at Dakota Cyclery for a shuttle to the north end. Jenifer was great to work with, she knows the area and the trail incredibly well. The trouble was that a shuttle ride for a single rider was pretty expensive, the per-person rate goes down the larger the group is. Luckily for me, a group of three other guys was coming up from the Twin Cities to ride the trail, via her fully-supported option, on that Friday the 25th, which worked for me. Dakota Cyclery can drop you off at the start of the trail, then shuttle a box trailer with all your camping supplies and other gear to the campsite you are riding to each day. So all you need on the bike with you is the day's worth of food and water. Cheating, obviously, but a lot of people seem to like riding the Maah Daah Hey this way.
As it turned out, late-September was an excellent time to be on the trail. Daylight hours were a bit short, at almost exactly 12 hours, but, the weather was excellent; even though it was hotter than average the days I was there, the warmest day was in the mid-80's for a high, with the other days in the upper 70's, and I was quite comfortable at night in a 20-degree bag and tarp shelter. Also, the fall colors were in full show, there were only a few species of deciduous trees, but there was a range of golden ashes mixed with green junipers in the uplands and also golden cottonwoods in the bottomlands. The little bluestem grass was adding to the fall colors with its autumn bronzing on many hillsides. Not much left for the wildflowers I adore, but just enough to keep it interesting.
I have heard that summer can bring unbearable heat to the area, and rain, most common in the spring, turns the trail to impassable clingy mud. Also, in the spring the river is often too high to ford. So I think I lucked-out on timing this trip.
Day 1: Racing the Sun, and Losing
I had driven through the day and into the night from Madison, arriving after midnight and crashing in the tent at the town campground which was closed for the season since it was after Labor Day. I was told that as long as I didn't mind not having any facilities, they wouldn't mind me putting up a tent there. Still, I thought it was wise to pack things up at dawn and head into town. Then I waited. I waited for Dakota Cyclery to open. At least this gave me time to get my gear all primed. Then I waited for the Minneapolis guys to show up. They were late. Then they dragged butt for almost three hours slowly getting their ill-prepared gear into the trailer. The original plan was to roll out of town by 9am. By the time we finally rolled out, it was after lunch, and then it was an hours drive to Bennett Camp.It was about 2:30pm when we finally got to the trailhead. I didn't waste any time getting rolling, and I had few words for the Minneapolis Crew since they delayed my start time by four hours. I knew it would be a challenge to make the 28 miles, fully loaded, in rough terrain, to the Magpie Camp by sundown at 6:45pm.
What I really remember from Day 1 is just being in awe of the landscape. I had been to the South Dakota Badlands before. These were different. The North Dakota Badlands are more vegetated. This has the effect of making them a little bit less dramatically sterile, but more diversely beautiful. The geology was fascinating, various minerals and fossils, including petrified wood all along the trail, whole forest buried 65 million years ago and re-exposed within the past 2 million years.


 |
| In this close-up you can see several petrified logs sticking out of this hill of what I assume is volcanic ash or silt from an ancient riverbed of roughly 65 million years ago. |


I was torn between trying to keep a fast pace and just being in awe of the landscape and curious about everything I saw. I settled on taking as many pictures as fast as I could, in the hopes of admiring them more later and spending more time poking around on the following days.
Being unloaded, the Minneapolis Crew kept a faster pace and passed me when I stopped for a snack break in the first hour. It was hard for the racer deep down inside me not to try to chase and pass them, but I was able to let it go. I plugged along through the day as the sun got lower in the sky. I had not planned to ride after dark. I had a small headlamp, that would facilitate this to a limited extent, but it wasn't very bright and doesn't have the battery life for a significant nighttime ride.
In the post-sundown twilight I started to see the lights of the Minneapolis Crew ahead of me. The tortoise was catching the hares. I caught them just as they were struggling across a deep, muddy stream crossing. We conferred briefly about the route, but two of them were already thigh deep in it, so they were committed. Having a USGS Topo map on my phone, I spied an old two-track that headed off the official route a bit, and directly to the Magpie camp. The trail had mostly faded, but it was still intact enough to follow. I hardly even got mud on my tires as I crossed the wash.
The muddy crossing the Minneapolis Crew had to endure was karma for being so pokey getting started in the morning, and I considered the matter settled. They further improved their karma when I discovered that the water pump at the camp wasn't working. They were happy to share the abundant load of water they had packed into the trailer. I was able to cook a well-deserved dinner and settle into bed. It was a windy night, but I had found a sheltered spot and the tarp and groundcloth combo served me fairly well.
Day Two: Devil's Pass and Fording the River
 |
| Dawn at Magpie Camp. |
With 12 hours of dark, I was up before dawn and on the trail early. I knew I had 35-40 miles to cover that day, so I wanted to take my time and enjoy it. As I rolled out of camp, the trail switch-backed to a ridge above camp, and from there you could see the previous days creek crossing. The Minneapolis Crew had taken the worst possible route as a beaver dam had backed up the water immediately downstream from the trail crossing. Something that would have been easy to avoid had we all gotten there in daylight... [cough, cough].
 |
| You can just make out where the trail cross the stream here, just upstream from the beaver dam. Whoops. |
I goofed around a little early-on, taking photos and videos. Then there was the slow climb to Devil's Pass. The climb was moderately long, but not too steep, only had to drop to the granny gear for a short stretch. Devil's Pass itself was impressive, a narrow ridge with a single-lane-road-wide path with fairly steep drops on either side. It was a pieces of cake to ride, as long as you kept your eyes on the trail... just keep your eyes on the trail.


 |
| Devil's Pass |

Speaking of the trail, overall, it was pretty nice. Sign posts ever few hundred feet help keep you on track: if you don't see a trail post, you're not on the trail! There were many miles of buff single track. But there was also areas pounded and potholed by hoof prints. And there were a lot of ruts. The trail was clearly not built to IMBA standards, and there were long stretches of trail that when straight down the contour without any rolling grade changes, water bars or switchbacks, leading to deep ruts in the silty soil. Sometimes there were one or two ruts paralleling the ridable trail. You really had to keep your head up and watch your line and be sure to choose the right path or else end up, well, stuck in a rut.
There was also the ever-present manure. It was a little annoying that the cattle had the entire grassland where they could poop, but they chose to do a disproportionately large amount of their pooping on the trail. You had to get good at telling apart fresh manure that you needed to avoid, from harmless, old dried out manure, and only swerve around the former.
Thought there are no mountains to climb, the trail is anything but flat. There are some big flat stretches, however, the frequent 50-100 ft climbs will wear you down over time. Then there are a handful in the 300-400 ft range. MTB Project claims about 8,200 ft of climbing over the whole trail, which is nothing to sneeze at. With a low gear of 24-36, these were fairly easy to tackle. I only had to walk a handful of climbs, and if I were in decent shape, I'm sure I could clean just about everything out there.
This is oil country. That famous Bakken Formation oil shale that you have to frack to get out of the ground. It was a strange juxtaposition to be riding through what seemed to be a remote wilderness, and then to smell raw petroleum, and to come around the corner and see an oil drilling platform.
 |
| An oil rig just off the trail, and the Minneapolis Crew heading down the trail on the right. |
A long downhill brought me to the bottom of the Little Missouri River valley. I hopped across a creek without getting my feet wet, but then was presented with the river itself. I decided to ford the river barefoot. The water was tan with fine silt and strangely silky. Almost like very soapy water. The bed of the river was a mix of rock and this fine silt/clay which felt like walking through butter. I'm pretty sure people pay a lot of money to have a spay day and be smeared with this stuff.
 |
| Selfie while crossing the Little Missouri River. |
After a short ride through the cottonwoods along the river bottom, it was time to get back to the top of the bluffs. This was probably the hardest climb in the whole trail, a steep 300' up, and I had to hike quite a bit of it. It was getting to be stiflingly hot, and most of the climb was exposed to the late-morning sun. Overall, there is very little shade. I had 4 liters of water, but I was going through it fast.
 |
| Looking back at the Little Missouri crossing from the bluff top. |
Shortly there after, I ran out of water completely. I was heading downhill towards Rosevelt's Elkhorn Ranch site, and I was hoping for some facilities there, but no dice. It was only about 3 more miles to the Elkhorn campsite, so I toughed it out. By the time I got there, I was cooked. Splashed myself off in the pump water, drank a couple bottles worth of water and then found a spot in the shade for a late lunch.

 |
| Rosevelt's Elkhorn Ranch site. |
The Minneapolis Crew soon followed... at least the first rider did. They had less water with them than I did, and ran out of it earlier than I had. One guy had started to develop heat stroke. Fortunately, one of the others was a medical doctor, so he knew how to take care of him. But the guy with the heat stroke was toast for the day, so the third guy rode up to higher ground to get a cell phone signal and call Jenifer from Dakota Cyclery for a pick up and shuttle to the next camp. This is a service she's happy to provide, for an appropriate fee.
I believe the two healthy guys rode the rest of the way to the Wannagan campsite where we were all staying that night, but they took a lot of roads to shortcut things. I stuck to the trail and got rolling again. At first it was pretty miserable, I think it was just pushing hard uphill on a full stomach. Once I backed off the pace a little bit, I felt much better and was able to hum along all afternoon. Though I was still going through water fast on this hot and windy day. Fortunately there are a few water caches along the trail that the MDHTA has set up. If the water is labeled with someones name, it belongs to them. If its not labeled, then its available for the taking, courtesy of the MDHTA. I was very happy to find this metal box in the late afternoon. Though I didn't need a lot of extra water, I would have run out again if I hadn't picked up that extra 1.5 liters.

Despite some minor navigational issues, I stormed into camp just after sundown and had just enough daylight left to set-up camp and get diner started before it got dark. The stars that night were amazing. With a nearly-full moon, it was a very bright night.
Day 3: Riding Into Towns Built by Various Mammals
I again work up before dawn and got on the trail fairly early. Honestly, the moon was so bright, it was hard to sleep. I had the goal of getting back to Medora by lunch time so I could continue my road trip west. Among the Minneapolis Crew, two had decided to call it quits, there was no extra cost for Jennifer to pick them up since she was picking up the trailer anyway. The doctor, however, wanted to ride to the Buffalo Gap trailhead. He passed me not long after we left camp, and I never saw any of them again.The terrain started to level out a bit in this southern section. Particularly once I was on the Buffalo Gap trail, it was a series of long, gentle valleys and ridges with arid grasslands rather than scrublands.

I entered one long valley that was an enormous prairie dog village. There were hundreds of holes and certainly thousands of prairie dogs. It was very entertaining watching them scurry away before me as I rode down the trail.
 |
| Each pale mound above and below is a prairie dog hole. |

 |
| A fall-blooming pasque flower?? |
 |
| Again, each light patch is a prairie dog hole, hundreds of them, probably thousands of prairie dogs in this village. |
After the turn-off for the Buffalo Gap camp/trailhead, civilization slowly started to make itself more visible. First there was the ranch that the trail traveled around, then you could see Interstate-94, and eventually you pass right under the interstate in a cattle culvert. This is followed by a scenic and fun downhill to the first paved road I'd seen in 3 days.
But the trail wasn't done with me yet. Another long climb was in store before the final descent into Medora. This section of trail was more frequently ridden and well designed, and maintained so it was just a whoop of fun single track. Finally the trail dropped me at the interstate off-ramp for a short bit of pavement pounding into town.

 |
| The last scenic overlook of the ride, Interstate 94 visible in the background. |
I found my car back outside of Dakota Cyclery and packed my gear up. I made a point to stop in and thank Jennifer for her help, and check on the Minneapolis crew, who had all survived to get back to town an hour or two earlier.

Then I was back on the road. To Glacier National Park, Kallispell, MT, and then with friends all the way to Bend, OR. We rode the McKenzie River Trail, among others. Also an amazing time, just in a slightly different way. As for the Maah Daah Hey, I can't recommend it enough as a short bikepacking route, if you can ever get yourself up to this remote part of North Dakota.